Showing posts with label paint. Show all posts

Tuesday, October 9, 2012

Tween Girls Room

As much as I don't want to admit it, Sassy is growing up.  She's no longer the girl she was when we purchased her Pottery Barn Kids Butterfly and Flower quilt when she was probably 4.  And as much as I still love it, it was time to say goodbye (well, actually it's washed and folded nicely in our basement waiting for a new home... at some point).

I showed you her new window treatment last week, but here is the entire room and the story behind it.

Sassy and I decided to work together and redo her room.  We first began looking for a new comforter or duvet.  She was drawn to dark colors, black mainly.  I wasn't so sure about that so we kept looking.  She looked online, in stores and in catalogues.  When she'd find something she liked,  I wouldn't.  When I'd find something I liked, she'd just shake her head.  It went on like that for awhile.  Then finally last November (yes, almost a year ago), I found a comforter, that we both liked.  It had just enough black for her and enough color for me.  We purchased it and began to plan her "new" room around it.


By the time we got the quilt and decided on a new paint color for her room, it was January.  Since then, we've painted and decorated.

And now you can see for yourself.

Her previous quilt (I didn't take any "before" pictures ~ what was I thinking!)


Her walls were a bright, yet pale yellow color.


Those are now a grayish, aqua color (I don't remember the actual name of the color ~ the original color was a Benjamin Moore color, but we had it color matched at Sherwin Williams)

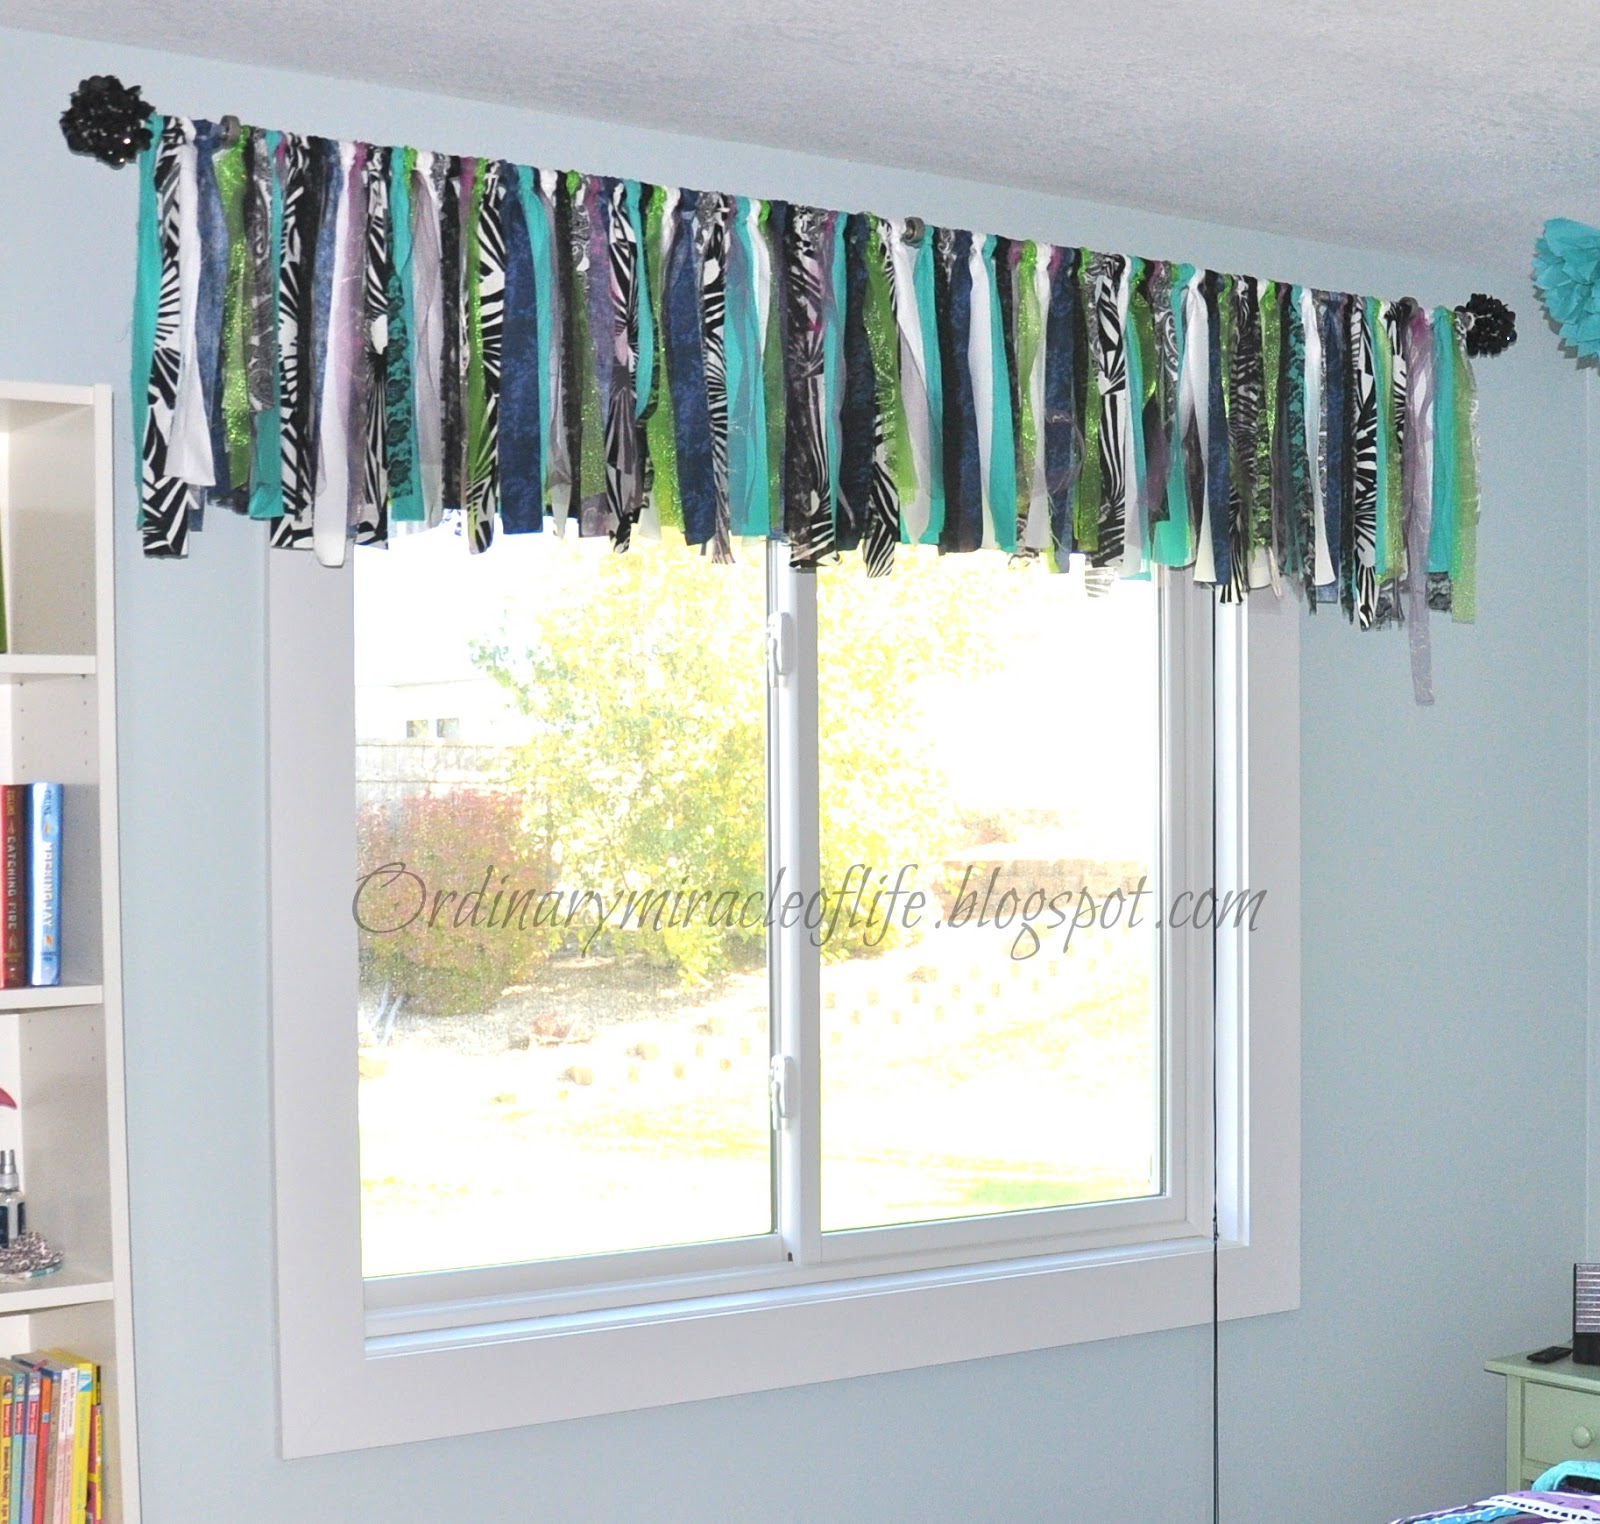
And the window Treatments, of course.  You can see the tutorial for those here.


Here is her "new" room finally finished.  Well, mostly finished.  We need to either purchase a new night stand, or paint the current one.  The pale green just doesn't quite work in the room.  And we would like some artwork for the wall to the right of the bed.


But other than that, we are pleasantly please with how everything turned out.


Room Details:
Shine print ~ wrote about it here, purchased from Studio JRU
Mirror ~ given to Sassy from her Aunt who purchased it at Target years ago and isn't using it in her house anymore
Softball Quote ~ saw on Pinterest, but didn't have store/shop link so we recreated it.  Frame is from Hobby Lobby
Color outside the lines ~ Hobby Lobby
Comforter ~ Pottery Barn Teen (no longer sell this one, but these two are similar ideas: Lilac Boho and Hampton Lola)
Love pillow ~ Pottery Barn Teen (no longer sell it)
Valance ~ Tutorial Here
Calendar White Board ~ Home Goods
Book Shelf Configuration ~ Ikea, Billy corner configuration
Bench ~ Lowes, years ago (was in our mud room before we redid it)


Wednesday, May 2, 2012

Whoo Hoo.... finally, our Kitchen Reveal!

Hubby and I had been discussing a kitchen remodel for some time now.  And after saving some $$ we were finally able to stop dreaming and make it a reality!  I will admit, we didn't do any of the physical work ourselves, but instead worked at picking out the new design and then worked at not having a kitchen for 6 weeks.

I admit, I had a vision for what I envisioned our kitchen to become and pinned them on my kitchen board via Pinterest (follow my boards by clicking here).  Here are a few of my pinned kitchens:

This was one of the first kitchens I ever pinned.  I LOVE everything about this kitchen.  I pinned this before we decided to go ahead and remodel.  I love the silver, the white, the glass and the pops of fresh greenery. 

In this picture, my eyes were drawn to the crisp white, clear glass and lighted cabinets.  

And this kitchen, another one of my early kitchen pins.  Once again I absolutely love everything about it.  It just felt timeless, classic, bright and clean.  I love the black countertops, subway tile and glass cabinets.

Alrighty, so now that you know what I like, here is our kitchen before:


and here my friends, is our after:


I knew I wanted an aqua color on the wall ~ the designer had me go with a lighter shade than I had planned and I am glad she convinced me of that.

I also knew I wanted a couple of glass cabinet doors.  Only a couple though, because we are a "real" family and this is definitely a kitchen that gets used and seriously, who wants to "see" tupperware?

I knew I wanted a farmhouse sink, subway tile, white cabinets, and silver hardware.  I also knew I wanted black countertops.  The kitchen designer mentioned doing the island top in white, a concept which had never crossed my mind.  She thought doing the black top on the island would create a sort of   "black hole" that I wouldn't like.  I wasn't convinced.  Then she pulled out my inspiration pictures (a couple of the above pics)  and pointed out that most of them had white islands and I must subconsciously like that look :)  I let my hubby make the final decision on that one and he chose white. I am certainly glad he did.  I love it.

Everything turned out amazing, meal time is no longer a foot fight under our little table and there is so much more work area for the kids to help me out.  
And yes, I am in LOVE with it!  


Details:
paint color ~ walls: White Rain by Benjamin Moore, accent color in window: Polished Slate by Benjamin Moore
faucet ~ Danze
countertops ~ Silestone in Tebas Black and Lagoon (island)


Monday, April 23, 2012

Painting over RED walls

I finally did it!
I've only been thinking about painting over the red walls in my family room since May of 2010.

I just couldn't decide what to do with the big black square we call a TV that the previous owner had semi ~ built into the wall (poorly I might add)  and some crazy cut outs for components.   Well, all that is still there as I have yet to convince my husband we should rip out that silly hollow wall and get rid of the enormous TV.  But all in good time ~ I'll start with baby steps :)

Anyway.  The red we had on the walls was Boston Brick by Behr.  Initially I loved it.  Before we moved into our current house we owned a little 1940's bungalow in the city.  When I say little, I mean not quite 1000 square feet.  Our new (current) house had 2400 square feet (before we finished the basement!).  I wasn't use to so much space and was wanting to shrink up the rooms and make them feel more intimate.  Therefore we went with the red.  Anyway, fast forward a few years and I was definitely ready for a change.  Something lighter.... fresher.

Here's what our family room looked like before in all it's Boston Brick glory:


Then, with 1 coat of gray primer (it kind of looks blue in this picture).


This was a SUPER important step ~ the primer helped cover and block the red from bleeding through.

Finally, on to the "real" color.

2 coats of this:


(Sand Dollar by Sherwin Williams)

and we are feeling light and airy (maybe a little tired of holding a roller to, but so worth it)!


Oh, and we got new windows in the entire house ~ and I was lucky enough to get to prime and paint all of the new trim ~ which is why the window trim doesn't match the rest of the "ugly" trim... all in due time! :)


Love this picture ~ but I'm not sure where to put it ~ which is why the protective corners are still in tact.


Can you tell I'm ready for summer?


Wednesday, March 21, 2012

A little kitchen progress

Yes, I said a little.....

We started with this:


Turned into this:


New plumbing, electrical and sheetrock:


Paint:


Cabinet delivery:


We'll see what happens today!


Thursday, March 1, 2012

Nails

A simple moment.
One that doesn't take very long.
But one that means a lot.
Especially to a ten year old girl.

A moment together.


Painting fingernails.


Memories.  Even though they seem simple and mundane mean so much.


Make them and Embrace them.